The Internet of Things cloud platform is a set of Internet of Things cloud service platform based on the core technologies of the Internet of Things such as intelligent sensors, wireless transmission technology, large-scale data processing and remote control and the Internet, wireless communication, cloud computing and big data technology. Users and management personnel can grasp the data of sensing equipment in real time through mobile phones, tablets, computers and other information terminals, obtain alarm and early warning information in time, and can adjust and control equipment manually/automatically, so as to make the above management easy and simple. At the same time, the Internet of Things cloud platform is also launched for Internet of Things education and scientific research, aiming to provide an open Internet of Things cloud service teaching platform. It can be used as the main training equipment for the professional courses of the Internet of Things application technology (Internet of Things Engineering) major of secondary vocational, higher vocational and undergraduate courses, mainly used in the technology display, hands-on experiments and comprehensive training of the Internet of Things application, and can also be applied to the display, operation training and technical development training of typical applications of the Internet of Things major and computer software development major. Through the CASE-DESIGNER, API, SDK, etc. related to the IoT cloud service platform, it provides a complete set of software and hardware environment for experiments, practical training, project design, competitions, graduation projects, etc., so that you can easily and quickly understand the application of the Internet of Things industry and learn related technologies of the Internet of Things.
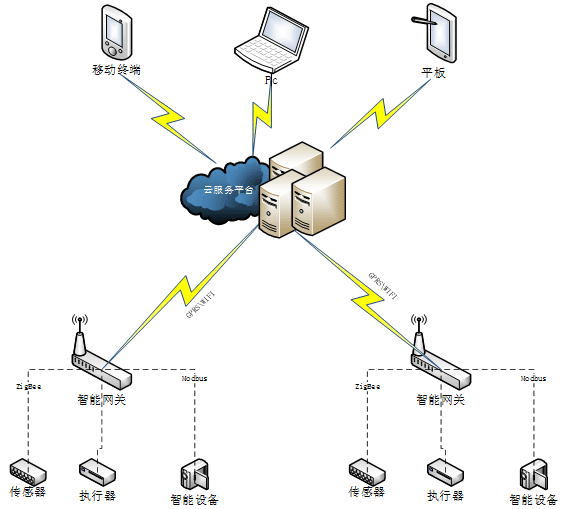
In the structure of this product, Browser/Server and Client/Server are used to process data transmission
between modules. The main structure of the system includes the device domain, gateway domain, platform
domain, and application domain. The infrastructure of the system is shown in the following diagram:

A variety of single components such as sensors, actuators, RFID, cameras, LEDs, and other IoT device hardware
It integrates an intelligent gateway that can parse a variety of IoT protocols and supports functions such as collection, transmission, and control
The physical architecture is shown in the figure:
Make full use of cloud computing virtualization technology to integrate software and hardware resources to achieve the advantages of more efficient computing power, deploy cloud platforms, and large-scale parallel processing of big data, data mining, distributed databases, and scalable storage systems to store and analyze sensor data.
Through the high concurrent processing speed, the sensing data sent by the terminal equipment is directly stored in the database and server memory, and the monitoring page reads the sensing data in the memory in an asynchronous and efficient second to achieve real-time monitoring, and the data volume increases by 500,000 per day.
There is no need to independently develop APP and WEB, and the online project designer provided by the platform can create sensors, charts and other components in a drag-and-drop manner, and publish them to the World Wide Web immediately after completion, which can be browsed instantly through a browser and WeChat.
Through the Internet of Things basic training simulation software, students can recognize, understand and be familiar with these common Internet of Things devices from the simulation system before they come into contact with hardware physical equipment, such as sensors, actuators, gateways, power supplies, RFID radio frequency devices, terminals, other peripherals, etc., so as to lay a good cognitive foundation for future training
Based on the web architecture, all you need is a web browser or mobile terminal, no need to worry about which operating system to use, any PC, smartphone, tablet and other devices with Internet access can access the cloud platform and the projects created through the cloud platform anytime and anywhere
The system provides a complete permission guarantee mechanism, login trace records, operation log records, device online, sensor history, device access platform and data transmission identity authentication, MD5 signature verification, SDK, API calls use HTTP packet headers to join MD5 Token verification, so as to ensure the confidentiality and security of data. The platform adopts a distributed architecture, and servers can be added at any time to disperse the pressure of the background server and improve the overall response speed of the server; Secondly, for functions that are more time-consuming and require more resources, asynchronous calling, event-driven model and event registration mechanism are implemented to maximize the advantages of asynchronous multi-threaded services. Thirdly, for commonly used background service data, we add the Memcache mechanism to cache common data and improve the response speed of background services. Finally, for large-scale and high-concurrency write operations, database clusters with high performance can maximize the concurrency efficiency and response speed of databases.
Platform B/S adopts MVC mode development, C/S adopts MVVM mode development, abstracts the object layer, display layer and control layer, there is no absolute dependency between the layer, the loosely coupled code organization is convenient for large-scale parallel development, and the whole system is upgraded, maintained and transformed in batches to provide the foundation, and the expansion ability is extremely strong. In addition to the education peers, the overall function has been surpassed in the IoT cloud of other non-education industries
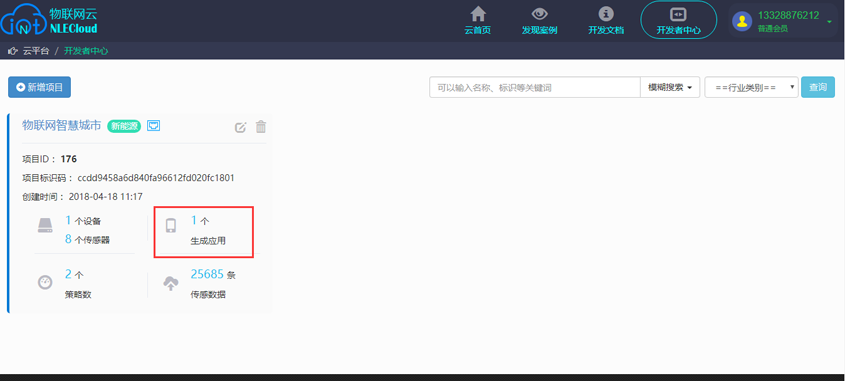
On the Developer Center page, you will find a list of projects created by the current account, each of
which includes five modules: Project Overview, Device Management, Logic Control, Application Management,
and Debugging Tools
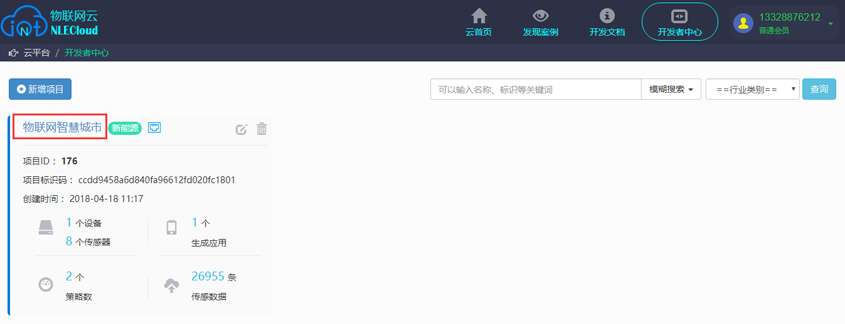
Click the name of a project to connect, and you will be taken to the project overview page by default,
as follows:
 1) You can click the "Modify Project Information" button to edit and modify the project;
2) Users can add operations step by step according to the operation steps in the interface;
Click Device Management in the menu bar to go to the following page
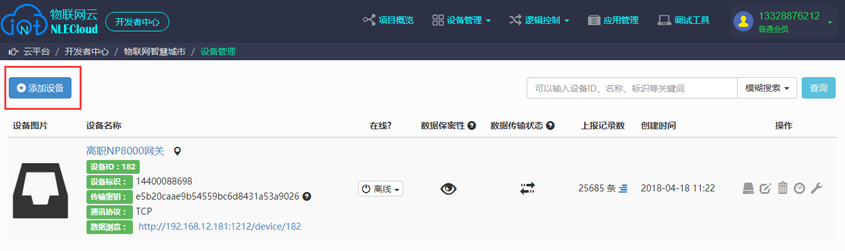 Click the "Add Device" button on the device management interface to add a device, pop up the Add Device
box, enter the device name, select the communication protocol, device identification, whether to check
data confidentiality, data reporting status, etc., and click "OK to add device" after filling in, as
follows
Click the "Add Device" button on the device management interface to add a device, pop up the Add Device
box, enter the device name, select the communication protocol, device identification, whether to check
data confidentiality, data reporting status, etc., and click "OK to add device" after filling in, as
follows
 After the device is successfully added, you can view the device on the device management page, and you
can add multiple device < br or> in device management
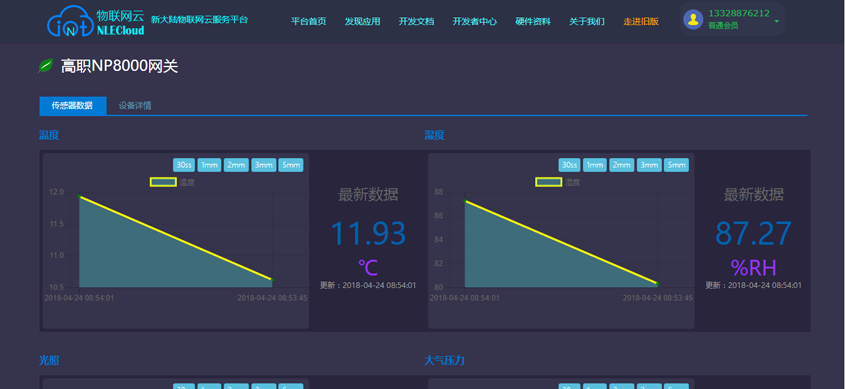
Click the device data browsing address to view the data
After the device is successfully added, you can view the device on the device management page, and you
can add multiple device < br or> in device management
Click the device data browsing address to view the data
Click "Device Management →Sensor Management" to view sensors, actuators, devices, and other
configuration information, and you can operate the device, or you can directly click the name to enter
and edit the device, as follows
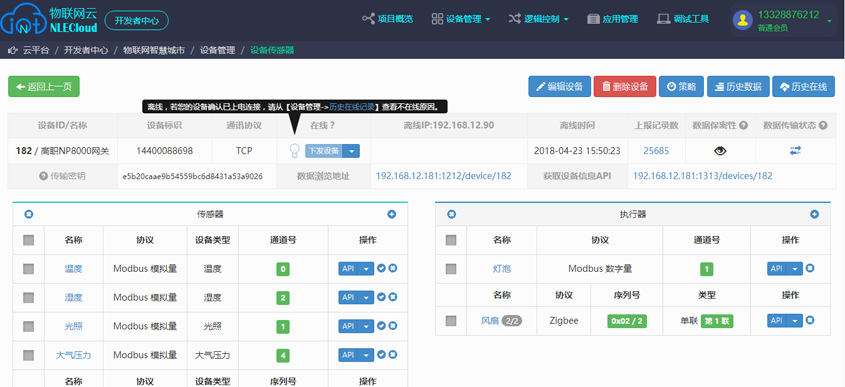 Edit gateway device: Click "Edit Device" to edit or modify the current device, if the current device is
online, you cannot edit the device, and you need to take the device offline before you can edit or
delete it.
Edit gateway device: Click "Edit Device" to edit or modify the current device, if the current device is
online, you cannot edit the device, and you need to take the device offline before you can edit or
delete it.
Delete gateway device: You can delete the currently selected device by deleting the device in the device
delete device. If the device is online and cannot be deleted, you need to disconnect the device before
deleting it
Click on the menu Device Management - > "Historical Sensing Data" to view the sensor data under the project. Select the start time, end time, and select the device to quickly query and select the data that meets the conditions
Click the menu Device Management - > "Historical Online Data" to view the online data records of the device under the project. Enter the start time, end time, and select a device to quickly query the data information that meets the conditions
Logic control is used to realize that when the environment meets specific conditions at a specific time,
it will automatically execute specific actions to achieve intelligent control, and the strategy will
execute the corresponding actuator at a specific time when the sensor meets specific conditions, thus
constituting policy management, click "Logic Control" to display as follows:
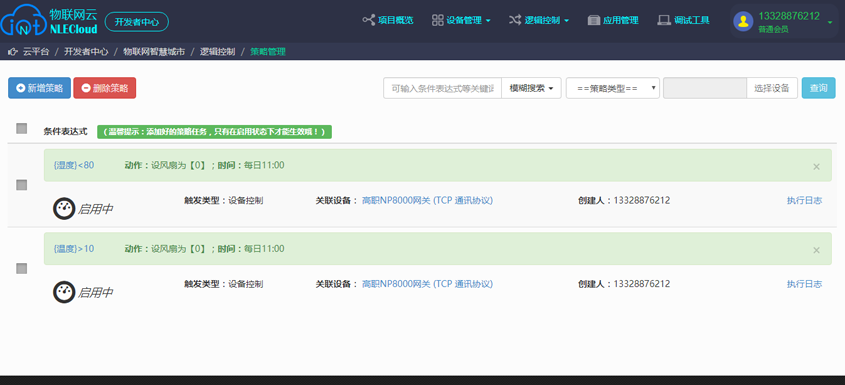 Add Policy: Click "Add Policy" to jump to the new policy page, select Gateway, and select Device Control
as the type.
Add a conditional expression (you can add multiple ones), add a policy action (when the selected sensor
satisfies the conditional expression, the executor executes the action), and select the time for the
policy to be executed (note: if the daily time is accurate to the minute, it will be triggered within
the minute, and the whole hour will be triggered within the hour),
After the policy is added, a policy information record
Add Policy: Click "Add Policy" to jump to the new policy page, select Gateway, and select Device Control
as the type.
Add a conditional expression (you can add multiple ones), add a policy action (when the selected sensor
satisfies the conditional expression, the executor executes the action), and select the time for the
policy to be executed (note: if the daily time is accurate to the minute, it will be triggered within
the minute, and the whole hour will be triggered within the hour),
After the policy is added, a policy information record
is generated
Policy Enablement: Only after the policy is enabled, the corresponding executor will be enabled when the
conditions in the policy are met.
Policy Execution Log: You can view the execution records of the policy in Execution Log, select a
policy, click Execution Log, and you can see all the execution log records of the policy
Policy query: You can enter the policy name, select the policy type, select the gateway, and click
"Query" to query the policy information required by the user.
Policy editing: Select an existing policy and click the policy name to enter the policy editing page
Policy deletion: You can delete a single policy or a batch of policies, select the policy you want to
delete in the check box, and click "Delete Policy" to delete the policy.
 Select an item to add an app to the developer interface, and then click "Generate App".
Click "New App" to enter the application name, application ID, select an application template, and
whether to share the location publicly.
Click "OK" after the application is completed, and the application will be added successfully;
Select the app you want to edit and modify, and then click the edit icon , and the edit box will pop up
as follows;
Select the app you want to delete, click the delete icon, and the app will be deleted.
If you select "Self-designed" for the project application, you can directly click the publish icon to
browse after publishing. Select "Design by yourself", click the "Design" link on the right side of the
application list of each project to connect to the "Project Designer" tool page;
Click the project application design icon to jump to the application designer;
The designer mainly has three module functions of module, page and HTML in the left menu bar, and the
module mainly includes page layout, sensor control, actuator control, etc., and users can only drag the
control in the module to the design area with the mouse when they want to design by themselves
Select an item to add an app to the developer interface, and then click "Generate App".
Click "New App" to enter the application name, application ID, select an application template, and
whether to share the location publicly.
Click "OK" after the application is completed, and the application will be added successfully;
Select the app you want to edit and modify, and then click the edit icon , and the edit box will pop up
as follows;
Select the app you want to delete, click the delete icon, and the app will be deleted.
If you select "Self-designed" for the project application, you can directly click the publish icon to
browse after publishing. Select "Design by yourself", click the "Design" link on the right side of the
application list of each project to connect to the "Project Designer" tool page;
Click the project application design icon to jump to the application designer;
The designer mainly has three module functions of module, page and HTML in the left menu bar, and the
module mainly includes page layout, sensor control, actuator control, etc., and users can only drag the
control in the module to the design area with the mouse when they want to design by themselves
Each user has only one and only one expiration time, which is a unique credential for designing and
browsing the application. On the page of Developer Center-> Personal Center-> ApiKey Management, click the "Generate" button on the page, select a time limit,
and then "Submit" to create an apikey