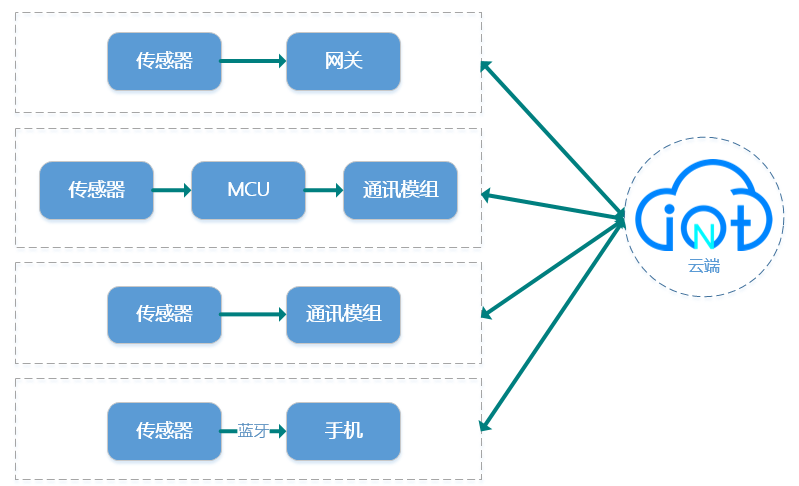
Device access is mainly for developers to connect devices to the cloud platform, data interaction
(reporting, transparent transmission), command and control, and other processes.
At present, the platform provides a variety of access protocol types to choose from, namely TCP, MQTT,
TCP transparent transmission, HTTP, etc., and the communication network can be common 3G/4G, WIFI,
Ethernet port, etc.;
The device access scheme can be any of the following diagrams:
 Before you can connect a device, you need to complete the following steps to create a device:
Then, according to the protocol type of the created project, the corresponding hardware is selected for
development, and the device identification and transmission key are
recorded.
The following describes protocols such as TCP, MQTT, TCP transparent transmission, and HTTP:
| common authentication | Security authentication (recommended) | |
|---|---|---|
| Core key | SecretKey | SecretKey |
| Authentication parameters | None | A token that consists of multiple parameter groups |
| Transferring Content | SecretKey (direct transfer key). | token, without key |
| Access time control | Not supported | Yes |
| Custom permissions | Not supported | Back support |
| Device resource usage | Lower | Higher |
| Security | Lower | Higher |
Common authentication directly uses the SecretKey as the transmission key to establish a connection with the cloud, which has no access time control and low security, but occupies less resources.
TCP wxString key="a5528869647040b4a88bb61dcb566e32";
   MQTT protocol String clientID = "mydevice";
             String userName = "50015";
             String password = "a5528869647040b4a88bb61dcb566e32";
Advantages of the authentication mechanism:
Token composition:
| parameter | type | required | parameter description | Examples of parameters |
|---|---|---|---|---|
| clientId | string | Yes | Indicates the client ID, and it is recommended to use the serial number of the device | mydevice |
| projectId | int | Yes | Indicates the project ID, which is the unique ID when the project is created on the platform, not the device ID | 50015 |
| method | string | Yes | Signature methods MD5, SHA1, and SHA256 are supported |
sha256 |
| timestamp | string | Yes | When the timestamp time in the access parameter is less than the current time, the platform will consider the access parameter expired and reject the access |
1537255523125 said: Beijing time 2018-09-18 15:25:23 |
| sign | string | Yes | Signature result string signature | B8ABEAE97F97C80C... |
The token consists of the above five parameter values, and each parameter value is combined with a "&"
character, such as
mtqqdevice1&50046&md5&1566276142807&B8ABEAE97F97C80C3CE7593F9ECDA63D
The algorithm for generating the sign parameter in the token is as follows:
You need to splice the clientId, projectId, method, and timestamp parameter values in a fixed order (no
splicing characters are required between the parameters), and then splice the SecretKey applied for on
the platform, and use the signature algorithm corresponding to the method to add the signature.
Suppose clientId=mydevice,projectId=50023, method=sha256,
timestamp=1566276142807,SecretKey=a5528869647040b4a88bb61dcb566eee,Then use the generated
sign parameter as follows:
    sign=sha256("mydevice50023sha2561566276142807a5528869647040b4a88bb61dcb566eee)

    token="mydevice&50023&sha256&1566276142807&" + sign
Go to "Data Download" -> TCP
"Device Access Protocol". Download to open and view, the protocol defines the connection
request, connection response,
Packet format for data reporting, data confirmation, command request, command response, heartbeat
request, heartbeat response, etc.; Defined in JSON data format.
If your device is a gateway or mobile phone, you can define a data structure based on the protocol
packets, and if it is an MCU or SOC device, you can perform some conversions.
This section mainly explains the process of using SDK to enter the device access
Migrate the SDK to devices such as gateways, MCUs, and SOCs, and connect to the access server in TCP.
| connection protocol | certificate | address | port |
|---|---|---|---|
| TCP | ndp.nlecloud.com or 117.78.1.201 | 8600/8700/8800 | |
| SSL/TLS TCP | Download | ndp.nlecloud.com or 117.78.1.201 | 8601 |
The TCP protocol adds SSL/TLS to provide direct secure communication between IoT devices and the cloud
platform, and the device carries the root certificate provided by the cloud platform. When a TLS
connection is established using port 8601, the device client performs both one-way authentication for
NLECloud,
As a result, there are high demands on man-in-the-middle attacks. The general process of TLS one-way
authentication is as follows:
The cloud platform and the device obtain the CA certificate (also known as the root certificate) from
the CA certificate center, the cloud platform applies to generate its own private key and certificate,
and the client uses the CA certificate to verify the certificate of the cloud platform.
After the verification is passed, a pair of public keys and keys are used to encrypt and decrypt the
communication, and the intermediate packets are encrypted.
Use the recorded Device Identifier and Transmission Key as parameters, use the
corresponding functions in the SDK to organize TCP handshake connection packets, and send them to the
platform to establish a handshake connection.
The cloud platform supports "normal authentication" or "security authentication" for access
authentication connection, see Access Security Authentication for details, and the
following is a code example of common authentication:
        /* Define the struct of the connection request according to the protocol */
        con_req.msg_type = PACKET_TYPE_CONN_REQ;
        con_req.device_id = "qiuzhb";
        con_req.key= "677abb3a5ff3456fb831c96482f11536";                For normal authentication, you can directly enter the transmission key
        con_req.ver = "V1.0";

        /* Use the packet_msg method in the cloud.h SDK to encapsulate the connection protocol */
        packet = packet_msg(&con_req);

        /*Send connection protocol packet data*/
        ret = send_packet(sock, packet, strlen(packet), 0);
If the handshake connection is successful, the cloud will send a response success message, and you will
see an online flag in Device Management:
 If the handshake connection fails, the cloud will also send a response failure message to tell you the
reason for the failure.
If the handshake connection fails, the cloud will also send a response failure message to tell you the
reason for the failure.
Use the interface functions provided in the SDK to write code to report data to the platform. For example, upload a set of data with a temperature of 30°C and a humidity of 80%RH.
        //Data type is 1 (JSON format 1 string)
        post_req.msg_type = PACKET_TYPE_POST_DATA;
        post_req.msg_id++;
        post_req.data_type = 1;
        post_req.data = "{\
            \"nl_temperature\": \"23\",\
            \"nl_light\": 2000\
        }";
        post_req.data_len = strlen(post_req.data);
        packet = packet_msg(&post_req);
        if(packet == NULL){
	        MAIN_ERR("packet_msg JSON 1 error\n");
        }else{
	        MAIN_DBG("POST JSON 1 \n");
	        send_flag = 1;
        }

        /*Send packet data, report sensor data*/
        if(send_flag){
	        ret = send_packet(sock, packet, strlen(packet), 0);
	        if(ret < 0){
		        MAIN_ERR("PACKET_TYPE_POST_DATA error\n");
	    }
	    free_packet_msg(packet);
	    send_flag = 0;
    }
1) Device Management - > Sensor Management - > the drop-down menu on the right of the Device Delivery
button, click "Real-time Data On"
2) Device Management - > Sensor Management - > Historical Data button
The cloud platform supports the TCP protocol based on WebSocket. You can first establish a connection
using WebSocket, and then on the WebSocket channel, use the TCP protocol to communicate, i.e., TCP over
WebSocket.
The connection is mainly based on the protocol and port number of the TCP connection URL
ws://ndp.nlecloud.com:8600.
An example of the connection code is as follows:
        if ("WebSocket" in window)
        {
            var connected = false;
            ws = new WebSocket("ws://ndp.nlecloud.com:8600");
            ws.onopen = function (event) {

                connected = true;
                var strHTML = '';
                strHTML+='Logging into the server...';
                strHTML+= GetFormattedTime();
                $('#log').prepend(strHTML);

                SendHandshakeMsg();

                setInterval(sendAlive, 55 * 1000);
            };

            ws.onmessage = function (event) {

                OnMessage(event);
            };

            ws.onerror = function (event)
            {
                if(!connected)
                {
                    var strHTML = '';
                    strHTML+='Connection error';
                    strHTML+= GetFormattedTime() ;
                    strHTML+='Unable to connect to the cloud, maybe the cloud is not up!';
                    $('#log').prepend(strHTML);
                }
                else
                {
                    var strHTML = '';
                    strHTML+='Communication error';
                    strHTML+= GetFormattedTime() ;
                    strHTML+= event.data ;
                    $('#log').prepend(strHTML);
                }

                ws.close();
                ws = null;
            };

            ws.onclose = function (event) {

                if(!connected)
                    return ;

                connected = false;

                var strHTML = '';

                strHTML+='Device offline';
                strHTML+= GetFormattedTime() ;
                strHTML+='System message: disconnected from the cloud';
                $('#log').prepend(strHTML);
            };
        }
        else
            ShowTopCenterWarning("Your browser doesn't support websockets!") , 20000);
Please go to "Data Download" -> "NLECloud MQTT Protocol" download and open view, the protocol defines the connection request, connection response, Packet format for data reporting, data confirmation, command request, command response, heartbeat request, heartbeat response, etc.; Defined in JSON data format.
Carry out a TCP connection to the access server.
| Connection protocol | Certificate | address | Port |
|---|---|---|---|
| MQTT | mqtt.nlecloud.com | 1883 | |
| MQTTS | Download | mqtt.nlecloud.com | 8883 |
MQTTS adds SSL/TLS (MQTT over SSL/TLS) to the MQTT protocol to provide direct and secure communication
between IoT devices and the cloud platform, and the device carries the root certificate provided by the
cloud platform. When a TLS connection is established using port 8883, the device client performs both
one-way authentication for NLECloud,
As a result, there are high demands on man-in-the-middle attacks. The general process of TLS one-way
authentication is as follows:
The cloud platform and the device obtain the CA certificate (also known as the root certificate) from
the CA certificate center, the cloud platform applies to generate its own private key and certificate,
and the client uses the CA certificate to verify the certificate of the cloud platform.
After the verification is passed, a pair of public keys and keys are used to encrypt and decrypt the
communication, and the intermediate packets are encrypted.
Use the documented "Device ID" and "Transfer Key". As parameters, organize the corresponding CONNECT packets and send them to the platform for handshake and establish an MQTT connection. The cloud platform supports "normal authentication" or "security authentication" for access authentication connection, see access security authentication, the following is the code example of the security authentication mode:
When a device is created, the platform assigns a unique transmission key (SecretKey) to each device, and the access token calculated by the SecretKey is used for access security authentication when the device is connected. The device can connect to the device through MQTT connnect packets, and the following steps are used to enter the three elements in the connect packet:
| whether the parameter is required | ||
|---|---|---|
| clientId | is the | device serial number |
| username | is the | device ID assigned by the platform when the device is created |
| password | is a | token that is calculated by SecretKey |
In this example, password = 'Token calculated by SecretKey' = clientId & username & method & timestamp & sign
If the handshake connection is successful, the cloud will send a response success message, and you will
see an online flag in Device Management:
If the handshake connection fails, the cloud will also send a response failure message to tell you the
reason for the failure.
Organize the corresponding sensor data and report the data through the MQTT "send message" protocol.
1) Device Management - > Sensor Management - > the drop-down menu on the right of the Device Delivery
button, click "Real-time Data On"
2) Device Management - > Sensor Management - > Historical Data button
The cloud platform supports the MQTT protocol based on WebSocket. You can first establish a connection
using WebSocket, and then use the MQTT protocol to communicate on the WebSocket channel, i.e., MQTT over
WebSocket.
WebSocket can be used in two ways: ws is a normal WebSocket connection, and wss is TLS encryption. If
you use WSS to connect securely, you need to use the same root certificate as TLS direct.
Here we will focus on the solution ws, wss, please move to MQTTS protocol access
node.
The WebSocket connection mode is mainly used to distinguish the protocol and port number of the MQTT
connection URL ws://mqtt.nlecloud.com:1883.
You can use some open-source MQTTJS frameworks such as mqttws31.js to connect, such as:
        var hostname = 'mqtt.nlecloud.com',
            port = 1883,
            clientId = 'mydevice',
            timeout = 50000,
            keepAlive = 60000,
            cleanSession = false,
            ssl = false,
            userName = '50046',
            password = '1528a42fa64e4f42b6da07540eb0a97f', //Support security authentication methods For details, see  security authentication methods
topic = '/sensor/datas',
            client = new Paho.MQTT.Client(hostname, port, clientId);
        Create a client instance
        var options = {
            invocationContext: {
                host: hostname,
                port: port,
                path: client.path,
                clientId: clientId
            },
            timeout: timeout,
            keepAliveInterval: keepAlive,
            cleanSession: cleanSession,
            useSSL: ssl,
            userName: userName,
            password: password,
            onSuccess: onConnect,
            onFailure: function (e) {
                console.log(e);
                s = "{time:" + new Date(). Format("yyyy-MM-dd hh:mm:ss") + ", onFailure()}";
                console.log(s);
            }
        };
        client.connect(options);
        Connect to the server and register the connection to successfully process the event
        function onConnect() {
            console.log("onConnected");
            s = "{time:" + new Date(). Format("yyyy-MM-dd hh:mm:ss") + ", onConnected()}";
            console.log(s);
            start();
            //client.subscribe(topic);
        }
Please go to "Data Download" -> "Device Access Protocol-CoAP" download to open and view, the protocol defines Device authentication, The packet format of the process of reporting data and subscribing/requesting/responding to commands. For more information about the CoAP protocol, see "COAP Protocol Comprehensive Analysis".
Make a UDP connection to the access server.
| connection protocol | certificate | address | port |
|---|---|---|---|
| CoAP | nbiot.nlecloud.com | 5683 | |
| DTLS CoAP | Certificate download | nbiot.nlecloud.com | 5684 |
DTLS is added on the basis of the CoAP protocol to provide direct and secure communication between IoT devices and the cloud platform, and the devices carry the root certificate provided by the cloud platform. When a DTLS connection is established using port 5684, the device client performs one-way authentication to NLECloud. As a result, there are high demands on man-in-the-middle attacks.
Use the recorded Device Identifier and Transport Key as parameters. Currently, the CoAP protocol only supports "normal authentication" to authenticate access, see access security authentication. The device first needs to send a device authentication request packet to establish a connection with the platform handshake in the following format:
POST /auth
Host: nbiot.nlecloud.com
Port: 5683
Accept: application/json
Content-Format: application/json
payload: {"clientId":"coapdebugclient","Username":" 51*61*","Password":" b27e0595118f4d7cb******72277f7a9"}| parameters | Description |
|---|---|
| Method | The request method only supports the POST method |
| URL | URL address, valid in the following value: /auth |
| Host |
Endpoint address. Value format: nbiot.nlecloud.com
|
| Port | Port, valid in the following example: 5683 |
| Accept | How the data received by the device is encoded. Currently, application/json is supported |
| Content-Format | The encoding format of the upstream data sent by the device to IoT Platform supports application/json |
| payload | The content of the device authentication information in JSON data format. For more information, see the following table. |
| JSON key | Whether it is required | Description |
|---|---|---|
| clientId | Yes |
Device ID when adding a device on the platform: 1) Newland Gateway: Enter the serial number in Gateway Settings -> [Parameter Settings] -> [System Parameters] 2) Newland Agricultural Gateway: Log in to the Agricultural Gateway Settings page in the browser - >> Device Status < device numberbr /> 3) Newland Home Gateway: Enter the main interface of the home gateway of the tablet, and the serial number in the upper left corner of the interface < BR /> 4) Other MCU/SOC/gateway/mobile phone and other devices: You can enter a unique identifier for connecting with the platform |
| Username | Yes | The ID of the parent project corresponding to the device on the platform |
| Password | Yes | The SecretKey value of the transfer key generated when the platform adds a device |
After the device authentication is successful, the result status code is returned, and the token is
returned at the same time, which needs to be brought with each subsequent data upload, for example:
{"ReturnCode":0, "token":"37hp01w1ssqomz8mdfzo001050****ad2b"}
| JSON key | Description |
|---|---|
| ReturnCode |
0: The handshake connection is successful
< br />
1: Handshake connection failed - protocol version error
< br />
2: Handshake connection failed - the device ID length exceeded the limit 3: Handshake connection failed - no device < br /> 4: Handshake connection failed - Device authentication failed < br /> 5: Handshake connection failed - The device is not authorized to connect < BR /> |
| token | The value of the token returned after the device is authenticated. |
After the device is authenticated with the server, the sensing data can be reported and uploaded.
POST /topic/{clientId}/data
Host: nbiot.nlecloud.com
Port: 5683
Accept: application/json
Content-Format: application/json
payload: {your_data}
CustomOptions: token| parameters | Description |
|---|---|
| Method | The request method only supports the POST method |
| URL | URL address, valid in the following value: /topic/{clientId}/data. In this example, the variable {clientId} must be replaced with the device identifier, and data represents the uploaded data |
| Host |
Endpoint address. Value format: nbiot.nlecloud.com
|
| Port | Port, valid in the following example: 5683 |
| Accept | How the data received by the device is encoded. Currently, application/json is supported |
| Content-Format | The encoding format of the upstream data sent by the device to IoT Platform supports application/json |
| payload | The content of the data to be uploaded, in JSON data format. For more information about the parameters, see payload in the following table. |
| CustomOptions | CustomOptions is an option, and the value can be the token value returned after device authentication, and the token information needs to be carried each time the data is reported. If the token becomes invalid, you need to re-authenticate to obtain the token. |
payload description
| JSON key | JSON value | Description | Example of a packet |
|---|---|---|---|
| t | 3 | The solid number 3 represents the data report | 3 |
| datatype | the format of the data report |
Specifically, the sensor data format type in the datas attribute is as follows = 1: 1 string in JSON format; =2: 2 strings in JSON format; = 3: 3 strings in JSON format; This attribute can report data from multiple sensors or multiple data from the same sensor < br /> according to different datatypes, where apitag1 is the identifier name of the sensor and value is the sensing value, which can be a number, floating-point, string, or binary base64-encoded string. < br /> data type is 1 (JSON format 1 string):
"datas":
{
    "apitag1": "value1",
    "apitag2": value2,
    …
}
|
|
|
The data type is 2 (JSON format 2 string): The format of apitag1 and value data is the same as above, and datetime1 must be in the yyyy-mm-dd hh:mm:ss format
"datas":
{
    "apitag1":{"datetime1":"value1"},
    "apitag2": {"datetime2":"value2"},
    …
}
|
|||
Example of data type 3 (JSON format 3 strings):
The value data format is the same as above.
The dt must be in yyyy-mm-dd hh:mm:ss format
"datas":
[
    {
        "apitag":"temperature",
        "datapoints":
        [{
            "dt":"2018-01-22 22:22:22", //Optional
            "value": 36.5 // Numeric floating-point string
        }]
    },
    {
        "apitag": "location",
        "datapoints":[…]
    },
    { … }
]
|
After the message is successfully linked, a success status code is returned.
The general principle is as follows, using the subscription/publishing protocol of the CoAP extension, the client subscribes a topic with a new command to the server through a GET request (set the Oberser value of Option to 0), and when the server detects a new command, it notifies the client, and the client writes the receiving command and business logic in the Respond of the request, and the subscription request is as follows:
POST /topic/{clientId}/cmd
Host: nbiot.nlecloud.com
Port: 5683
Accept: application/json
CustomOptions: token
Oberser: 0| parameters | Description |
|---|---|
| Method | Request method, only the GET method is supported |
| URL | URL address, valid in the following value: /topic/{clientId}/cmd. The variable {clientId} must be replaced with the device identifier, and cmd represents the subscription command |
| Host |
Endpoint address. Value format: nbiot.nlecloud.com
|
| Port | Port, valid in the following example: 5683 |
| Accept | How the data received by the device is encoded. Currently, application/json is supported |
| CustomOptions | CustomOptions is an option, and the value can be the token value returned after device authentication, and the token information needs to be carried each time the data is reported. If the token becomes invalid, you need to re-authenticate to obtain the token. |
| Oberser | If the fixed value is 0, the server will notify the client when the number of commands changes to the URL. If the value is 1, the subscription is canceled. |
After the client successfully subscribes to a command, the server delivers a command (such as a switch
to control a sensor), and the client receives the command in the response of the last subscription
request in the following format:
{"t": 5,"cmdid": "123456789", "apitag":"rgb_open","data":{ See description in the table below } }
| JSON key | JSON value | Description | Example of a packet |
|---|---|---|---|
| t | 5 | Solid number 5 | 5 |
| cmdid | Command number GUID | The server generates a string number of packets, which the client device sends back to the server when it sends a command response after receiving the command. | bcd8922d-cd23-4715-9f31-c96a596f622a |
| cmdid | Command number GUID | The server generates a string number of packets, which the client device sends back to the server when it sends a command response after receiving the command. | bcd8922d-cd23-4715-9f31-c96a596f622a |
| apitag | Sensing identifier (nullable). | The handle name for when adding a sensor on the platform. | rgb_open |
| data | Command value | A command value, which can be a number, a float, a string, or JSON | example Numbers: 1 Floating-point: 12.3 String: "Hello" JSON:{"onoff":1 , "red" : 23.5} |
After the client processes the command, it will upload the processing result to the server, and request the upload of data resources using the common message type NON POST.
POST /topic/{clientId}/data
Host: nbiot.nlecloud.com
Port: 5683
Accept: application/json
Content-Format: application/json
payload: {your_data}
CustomOptions: token| parameters | Description |
|---|---|
| Method | The request method only supports the POST method, and the type message is set to NON |
| URL | URL address, valid in the following value: /topic/{clientId}/data. In this example, the variable {clientId} must be replaced with the device identifier, and data represents the uploaded data |
| Host |
Endpoint address. Value format: nbiot.nlecloud.com
|
| Port | Port, valid in the following example: 5683 |
| Accept | How the data received by the device is encoded. Currently, application/json is supported |
| Content-Format | The encoding format of the upstream data sent by the device to IoT Platform supports application/json |
| payload | The content of the data to be uploaded, in JSON data format. For more information about the parameters, see payload in the following table. |
| CustomOptions | CustomOptions is an option, and the value can be the token value returned after device authentication, and the token information needs to be carried each time the data is reported. If the token becomes invalid, you need to re-authenticate to obtain the token. |
payload description
| JSON key | JSON value | Description | Example of a packet |
|---|---|---|---|
| t | 6 | The solid number 6 represents the data report | 6 |
| cmdid | Command number | The string command number at the time of the command request is returned as is | c21f73d6-d6a1-4c0d- a7a0-1a61fd51ed73 |
| status | Status results | One byte represents 0: The processing is successful. 1: Processing failed; Other: Reserved values; | 0 |
| data | Command response value | The response value, which can be a number, floating-point, string, JSON |
Go to "Data Download" -> TCP
Transparent Transmission "Device Access Protocol" to download and view.
NLECloud allows users to upload data and deliver commands through TCP transparent transmission, which
provides a feasibility for any TCP-based communication device to access NLECloud.
TCP transparent transmission has a high degree of freedom, which allows users to customize the protocol
and complete the interaction with other protocols according to user-defined scripts.
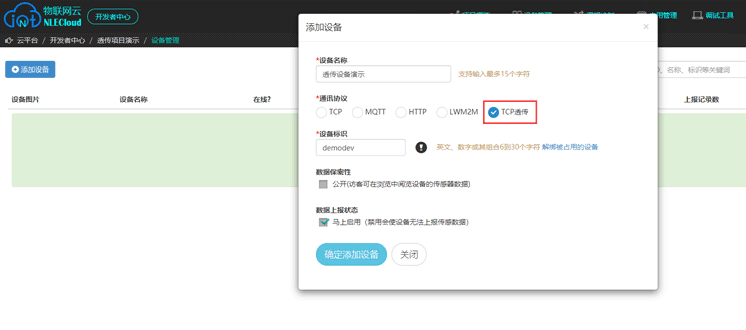
First of all, you need to create your own project on this platform ( how do I create a project?
),
If you don't have a platform account yet, you can check registration help
Add a device with TCP transparent transmission protocol and add related sensing devices under the
project, please go to here
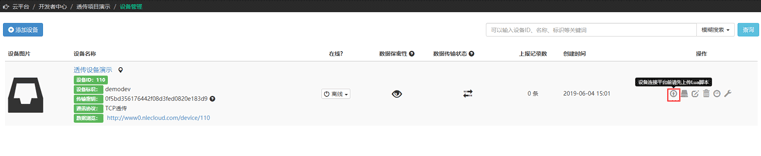
 Upload the script by clicking on the script icon prompted in the image below
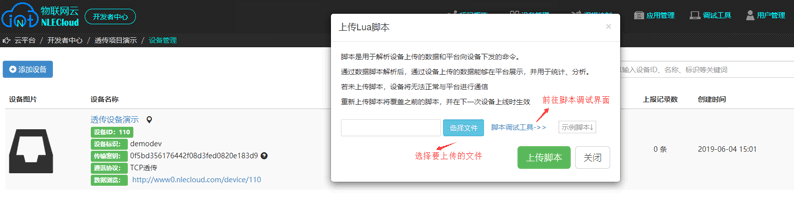
Enter the window shown in the following figure to perform the upload operation, download the script demo provided by the platform, customize it according to the
instructions in the demo and refer to the Lua script specification of the document, and then upload the
final script file to the platform
 The device sends a handshake request to the platform, and if the connection is successfully
established, you can see the online status of the device on the platform:
The device sends a handshake request to the platform, and if the connection is successfully
established, you can see the online status of the device on the platform:
 Example of a handshake message:
    {
        "t": 1, -- fixed identifier indicating a handshake request
        "device": "P123456789", -- device identifier
        "key":"9861d43a0733415ab5424ee7d0f1c685", --transfer key
        "ver":"v1.1" -- the proposed version number of the client
    }
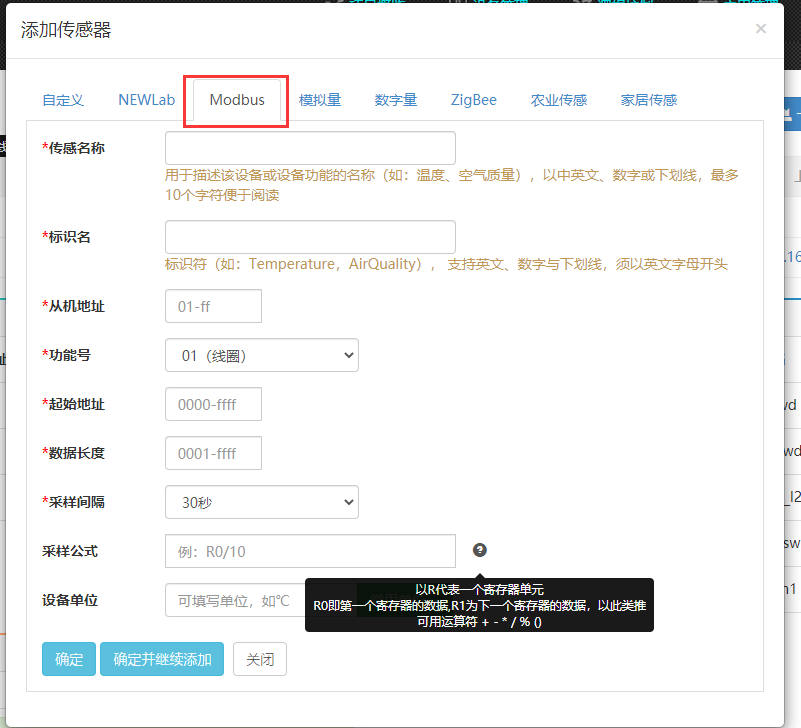
Please go to "Data Download" -> Modbus"Device Access Protocol" to download and open it.
NLECloud supports users to collect data and issue commands through the Modbus protocol, which provides a
feasibility for any Modbus-based communication device to access NLECloud.
Modbus communication protocol is an industrial fieldbus communication protocol, which is widely used in
industrial automation control, and can realize functions such as industrial data acquisition and
control.
MODBUS is a request/response protocol and provides services specified in the function code. A MODBUS
function code is an element of a MODBUS request/reply PDU (Protocol Data Unit).
First of all, you need to create your own project on this platform ( how do I create a project?
),
If you don't have a platform account yet, you can check registration help
Add a device with a communication protocol of Modbus and a modbus sensing device under the
project, and the specific operation can be moved here
 The device sends a handshake request (in byte form to the device MAC code) to the platform for
authentication, and if the connection is successfully established, you can see the online status of
the device on the platform.
The device sends a handshake request (in byte form to the device MAC code) to the platform for
authentication, and if the connection is successfully established, you can see the online status of
the device on the platform.
After the device logs in successfully, the server will not return data, and if the login fails, the
server will actively disconnect.
After the handshake is successful, the platform will periodically issue acquisition instructions to
obtain data according to the settings of the user's creation of the sensing device.
In order to keep the connection to the platform uninterrupted when the device is idle, it is
necessary to send heartbeat packets periodically to ensure that the network connection is
uninterrupted. The time interval must be less than 3 minutes.
Example of a handshake message:
9C A5 25 A9 7A 2AHTTP protocol access mainly uses the RESTful style "add sensor data" API interface to report data, and does not need to establish a "connection request" and other processes. After adding sensors to the cloud, you can directly report the data in JSON format. Here are the steps:
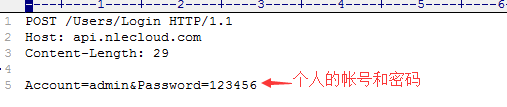
Use your account and password to request account login to the interface
"http://api.nlecloud.com/users/login", and the requested data packet is:
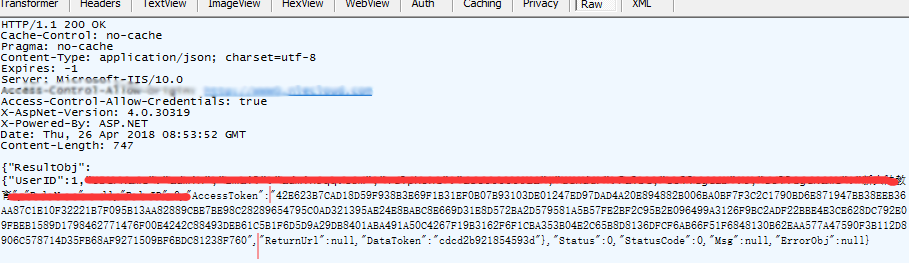
 After the request is successful, an AccessToken is returned:
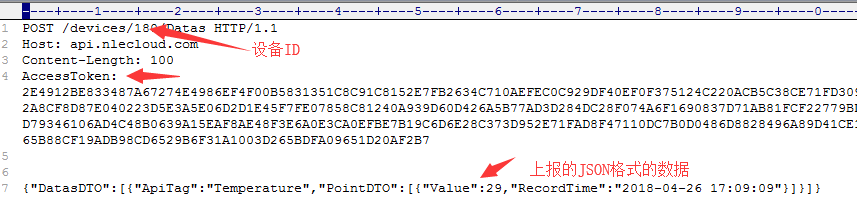
Bring the AccessToken to request http://api.nlecloud.com/devices/{deviceId}/datas, and replace
{deviceId} with the real device ID
1) Device Management -> Sensor Management -> the drop-down menu on the right of the Device Delivery
button, click "Real-time Data On"
2) Device Management -> Sensor Management -> Historical Data button